

How To Make A Flow Chart On Excel
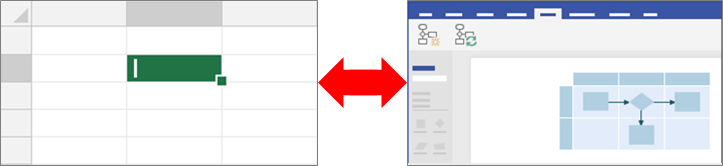
Would yous like to automatically create a detailed, polished Visio flowchart from an Excel workbook? You can do this past using the Data Visualizer templates. Each template has an associated Excel workbook used to convert procedure information into a flowchart in Visio. You tin besides employ your own custom Excel template, map Excel data to shapes in the Create Diagram from Data sorcerer, and automatically create the diagram. Yous can even add additional columns of data in Excel that are converted to Visio shape data.
Visio also supports two-way synchronization between the Visio diagram and the Excel workbook. Non merely tin yous create the flow chart, past editing data in Excel and refreshing the diagram from Visio, but you can likewise make changes to the Visio Diagram so update the Excel data from the diagram.
The ability to use the Data Visualizer templates is only bachelor with Visio Plan two. If you're not certain what version of Visio you're using, select File > Account > About Visio. Come across Visio Plan two to learn more well-nigh the subscription version of Visio.
If you lot don't run into the Data Visualizer templates or if you lot have other questions effectually getting started, visit the Data Visualizer oftentimes asked questions page.
We likewise take three new templates that let you to create a chart without having a Visio license:
-
Organization chart based on Excel data
-
Basic flowchart based on Excel data
-
Cantankerous-functional flowchart based on Excel information
In this article
-
Create a Data Visualizer diagram
-
How Excel columns interact with Visio flowchart components
-
Apply other stencils to create a Data Visualizer diagram
-
Create and link to sub-process diagrams
-
Apply Data Graphics to your diagram
-
Manage the Excel workbook linked to the diagram
-
Adjacent steps
Create a Data Visualizer diagram
Before you brainstorm
Gather your ideas and work them out in a typhoon course on newspaper or by inking. This crude draft can assist you jump-start your work and make the following steps go smoother.
To create a Data Visualizer diagram, you can work simultaneously in Excel and Visio. You might find it easier to work in ii windows on your Windows device or in a multi-monitor environment. Visually comparing your piece of work between Excel and Visio helps ostend you are doing what yous intend to practice.
Recommended Watch this Microsoft Function video to see information technology in action: Data Visualizer: Demo.
Stage 1: Choose a Data Visualizer template
-
Open Visio, or select File > New if you are editing a diagram.
-
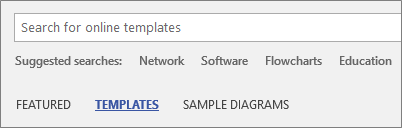
Select TEMPLATES.
-
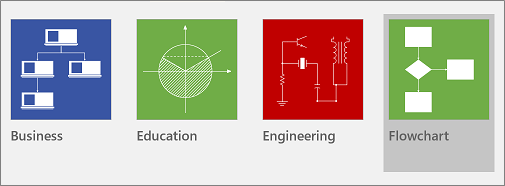
Select Flowchart.
-
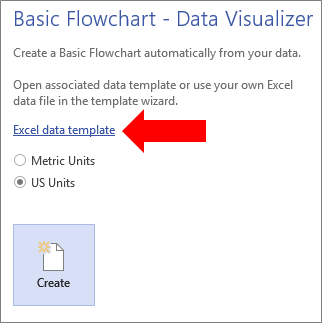
Select Basic Flowchart - Data Visualizer, Cross-Functional Flowchart - Information Visualizer, or Audit Diagram - Data Visualizer.
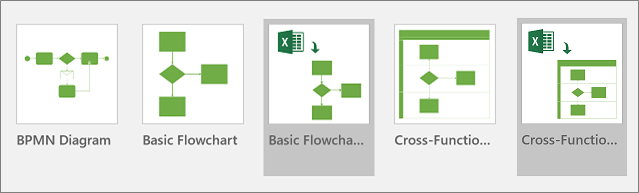
A Data Visualizer template has an Excel icon in the height left corner.
For more data on flow charts and their shapes, see Create a bones flowchart and Create a cross-functional flowchart.
Stage 2: Create an Excel workbook
-
In the template preview, select Excel data template.
Annotation If yous want to use the same sample Excel templates used in this commodity for reference, you can download them from the post-obit links:
-
Bones Flowchart Procedure Map
-
Cross-Functional Flowchart Procedure Map
-
-
Select File > Save, specify a reckoner, network server, or SharePoint document library, enter a file name, then select Salve.
-
To add a new worksheet, at the bottom of the workbook, select New canvas
 .
. -
Create an Excel table. For more information on using Excel tables, encounter Overview of Excel tables, Create or delete an Excel tabular array, and Resize a table past adding or removing rows and columns.
-
Add columns and rows to the table which are used to create the Visio diagram. There are specific requirements for the Excel table column headers and values. Utilise the section, How Excel columns interact with Visio flowchart components every bit a visual guide.
Stage 3: Add additional shape data to the Excel table (optional)
-
Examine the Process Map tab in the Excel template. The columns in the Excel tabular array are colored blue and green. The colour provides a visual clue about the divergence betwixt the columns.
The blue columns are used to create the flowchart in the Visio diagram. All columns are also added every bit shape data.
-
To add together additional shape data, add ane or more than columns to your Excel table.
The greenish columns indicate additional shape information yous can add to each shape. You can add any number of additional columns. Past default, this data is not visible in the diagram, unless you add information graphics. To see the shape information in the Visio diagram, select Data > Shape Information Window. For more data about shape data and information graphics, run across Add data to shapes and Data graphics, an overview.
Stage 4: Create a Visio diagram with the magician
-
Switch dorsum to Visio, in the template preview select your unit of measurement, and then select Create.
-
In the commencement folio of the Create Diagram from Data magician, do the following:
-
Nether What diagram do you want to create from data, select a template: Bones Flowchart, Cross-Functional Flow Chart (horizontal), or Cross Functional Flow Chart (vertical).
-
Under Select the Excel workbook, select a workbook from a list of most recently used workbooks, or select Browse to locate the workbook you created in Stage 2.
-
Under Select a tabular array or a custom range in the workbook, select the table containing your Excel procedure data.
-
Select Finish. This accepts all default values that Visio fills in for the other pages of the wizard.
-
As a result, the diagram is automatically created inside a container. Additional Visio pages are added depending on the size of the flow chart.
Stage 5: Salvage the Visio diagram
-
Select File > Save, find a location, enter a file name, and so select Save.
Information technology's a good idea to go along the Excel and Visio files in the same location considering they work mitt-in-hand.
Phase 6: Synchronizing the data and the diagram
Subsequently you create a diagram with Information Visualizer, yous may want to make changes to it. Visio supports bi-directional synchronization between the source data and the diagram.
Tip Keep both files synchronized and up-to-date afterward you finish working with them. When you change the Excel data, refresh the diagram; when you alter the diagram content, update the Excel data.
To change the data in Excel and so refresh the diagram
-
Brand changes to the source information in the Excel tabular array. You tin can add, update, or delete rows.
-
Salve the Excel workbook.
-
In Visio, click in the diagram container to enable the Data Tools Pattern tab in the ribbon, and so select Refresh Diagram.
As a consequence, the changes you made in the Excel workbook are displayed in the Visio diagram. Annotation the post-obit:
-
If you lot have made whatsoever changes to the diagram that may get lost after refreshing, Visio displays a Refresh Diagram Conflict dialog box.
-
Refreshing but makes changes to the shapes and connections inside the container.
-
Any formatting changes y'all make to the shapes or connectors inside the container are preserved.
-
Keep all diagram shapes and connector lines inside the container. Whatever other objects on the page but outside the container are not afflicted. For more information nearly containers, see Analyze the construction of diagrams past using containers and lists.
To modify the content in the diagram then update the data in Excel
-
Make changes to the Visio diagram. You tin add, update, or delete shapes and connectors.
-
If the Excel workbook is on a desktop computer or network file server, make sure it is saved and closed.
-
Click in the diagram container to enable the Information Tools Design tab in the ribbon, and and so select Update Source Information.
As a result, the changes you made in the Visio diagram are updated in the Excel workbook. If information may get lost in Excel, Visio displays the Update Source Data Conflict dialog box. To avoid bug, use the following best practices:
-
Salvage a backup of the Excel data before yous overwrite changes.
-
In the Excel workbook, utilise an Excel Tabular array every bit your data source, not a custom range. Afterwards y'all select Overwrite in the Update Source Data dialog box, Visio converts the custom range to an Excel table.
-
Practise not use formulas in the Excel data source. After yous select Overwrite in the Update Source Information dialog box, Visio converts the formula to the formula result.
-
You created the diagram using the following option in the Create Diagram from Data wizard where data columns are mapped to functions and phases: Mapping > More Options > Retain the society of column values from your data to create > Select Function or Swim lane or Select Phase or Timeline. In this case, Visio requires an boosted column in your data to stand for the connection between shapes. Later on you select Overwrite in the Update Source Data dialog box, the boosted column is added.
-
You created a cantankerous-functional flow chart diagram with both swimlanes and phases based on the order of information values in Excel. You created the diagram using the post-obit choice in the Create Diagram from Data wizard where data columns are continued to procedure steps and activities: Mapping > Specify how to connect the procedure steps/activities > Connect sequentially. In this case, Visio requires an additional column in your information to represent the connection between shapes. If you change the lodge of the swimlanes or phases in the diagram, the social club is changed in the data source. Subsequently you select Overwrite in the Update Source Data dialog box, the swimlanes and phases in the diagram no longer follow the order of the information in the Excel workbook.
Stage 7: Customize the interaction between the Excel table and the Visio diagram (optional)
There are times when you may want to customize the creation of your Data Visualizer diagrams. For example, you lot may want to use different shapes to arrange to your organization standards, or map to different column names in the Excel tabular array.
-
When you select Create to enter the Create Diagram from Data wizard and after yous enter values in the first folio (See Stage 4), select Next or Dorsum to brandish each page in the wizard.
-
Select Help (?) to get more information nigh how to customize each selection on the page. For more information, run across Utilise the Create Diagram from Data sorcerer.
Meridian of Page
How Excel columns interact with Visio flowchart components
Use the post-obit image walkthrough to understand how each Excel column is used to create the Visio flowchart.
Notation that a serial of "tabs" ("ID," "Description," "Next ID," and so on) are used below to illustrate the various columns of an Excel tabular array. Click a tab name to see the illustration for that column.
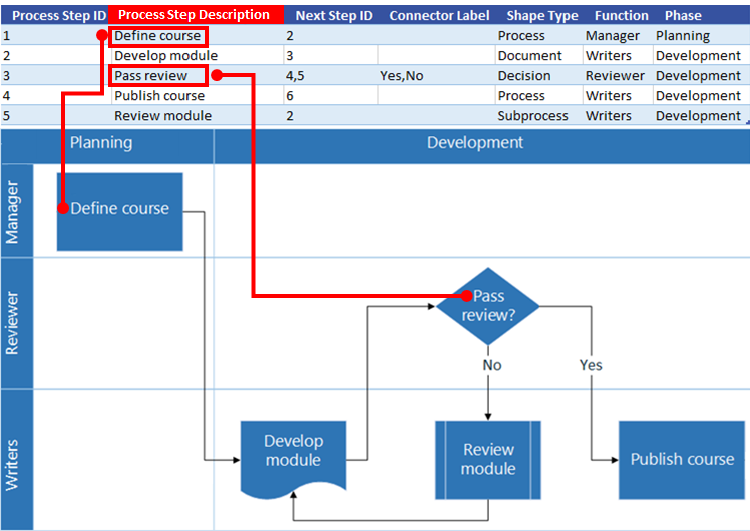
Procedure Pace ID A number that identifies each shape in the flowchart. This column is required, and each value in the Excel tabular array must be unique and non be blank. This value does not appear on the flowchart.

Procedure Step Description Text added to each shape in the flowchart.
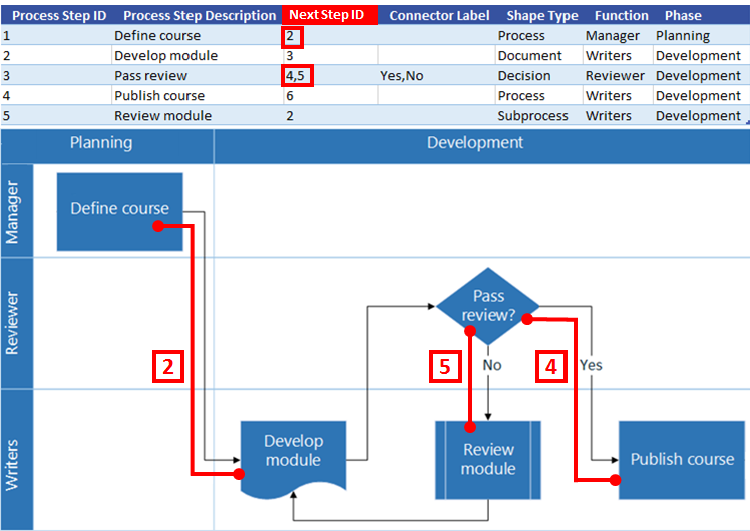
Next Step ID The Procedure Step ID of the next shape in the sequence. A branching shape has two next steps and is represented by comma-separated numbers such as 4,v. You can have more than two next steps.
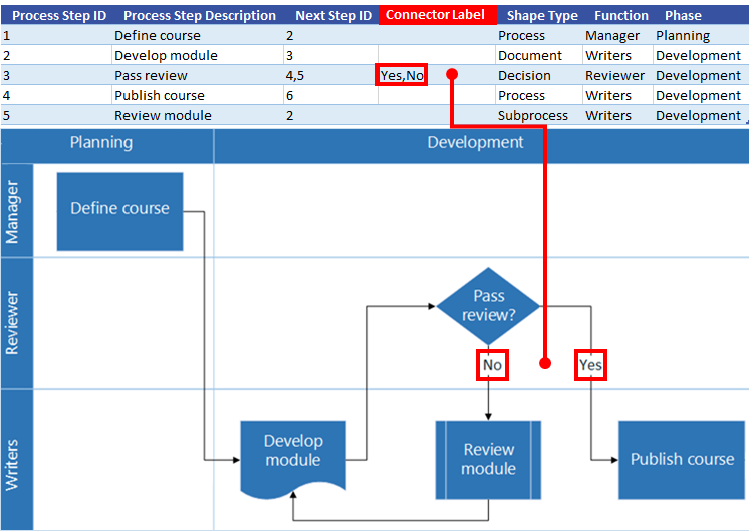
Connector Label For branching shapes, connector labels are represented as text separated by a comma, such as Yes,No. Yeah corresponds to 4 and No corresponds to 5 in the example.
Shape Type The blazon of shape you lot want to represent in the Visio diagram, such as Procedure or Decision. Microsoft recommends using the driblet-down lists to help validate your choices.
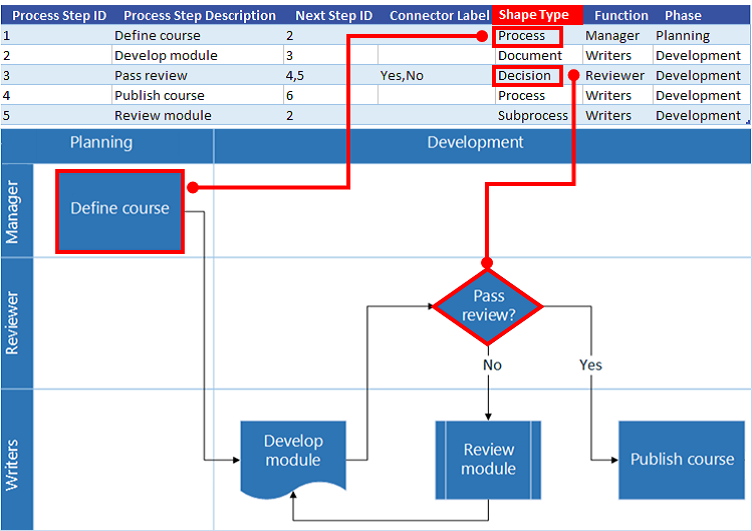
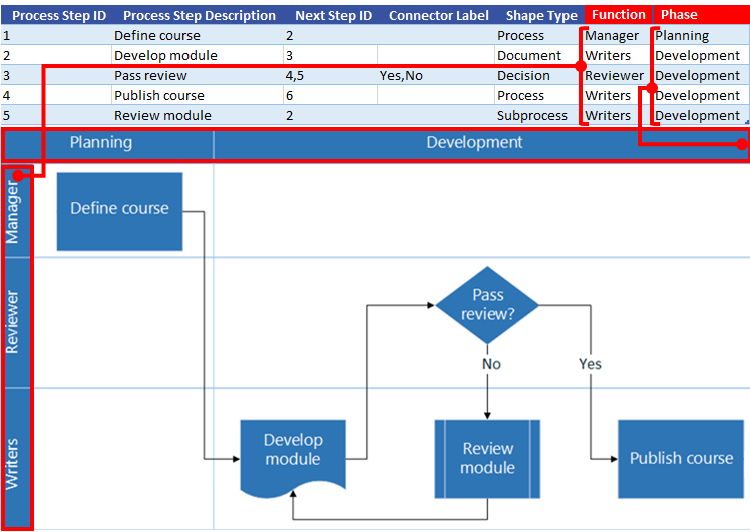
Role and Stage The role (or swimlane) and phase (or timeline) that each shape belongs to. This column only applies to a Cross-Functional Flowchart diagram and is ignored by a Basic Flowchart diagram.
Elevation of Folio
Apply other stencils to create a Data Visualizer diagram
Besides using the Information Visualizer templates, you tin can also apply stencils from other templates when y'all create a Data Visualizer diagram. For example, create process diagrams for financial transactions or inventory direction. There are other process-oriented stencils including BPMN Basic and Work Flow Objects templates. Y'all can fifty-fifty add custom shapes by using the My Shapes stencil. For more information, come across Create, save, and share custom stencils.
-
Open a Data Visualizer diagram (Bones Flowchart or Cross-Functional Flowchart) that y'all have already created.
-
Select Create to enter the Create Diagram from Data wizard and after you enter values in the offset page, select Adjacent until y'all display the Shape Mapping page in the wizard.
-
Add ane or more stencils using the More Shapes option.

-
Select any shape and map it to the information values of your Shape Type column by dragging it.

Elevation of Page
Create and link to subprocess diagrams
Currently, the Data Visualizer feature doesn't support the cosmos of sub-processes from a single Excel table. Still, y'all can create multiple diagrams using unlike tables in 1 Visio file, so link shapes every bit an alternative solution.
-
In the Visio desktop app, select a Data Visualizer template and then select the Excel data template link to open Excel. So select Create to open the Visio Data Visualizer template.
-
Use the Excel data template to create tables for your processes and sub-processes. Put the table for each sub-procedure in a dissimilar sheet and then save the Excel file.
For example, Canvass ane: Principal process, Canvass 2: SubProcess1, Sheet iii: SubProcess2.
-
Switch back to the Visio desktop app and utilize the sorcerer to import the Main Process table to Folio 1 of your Visio canvas.
-
Below the canvas, select the + icon to create a Page 2. In the Data tab, select Create to launch the import sorcerer once more. Choose to import data from the next sheet in the Excel workbook and complete the steps in the wizard.
-
Keep to create new pages in Visio and using the wizard for each of the sub-process data tables yous've created.
-
Finally, select the page with the main process diagram and right-click a shape to link to a sub-process. Select Hyperlink and link it to any shape on 1 of the sub-process diagrams.
Top of Folio
Apply Information Graphics to your diagram
You can enhance your diagram past adding data graphics, which helps you lot visualize shape information on the diagram. In result, you can plow your diagram into a process dashboard in which the data graphics display Key Performance Indicator (KPI) data using data graphics icons based on your shape data.
-
Open the Data Visualizer diagram.
Select the container for which you want to utilize Data Graphics.
-
Select Information > Data Graphics Fields.
-
Select the data graphic fields you lot want to add together to your diagram.
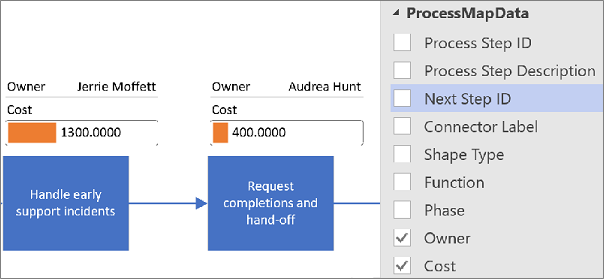
The data graphics are practical to the entire diagram. To hide data graphics for sure shapes, keep the data cavalcade values blank in the Excel workbook for those rows.
-
If you want, yous can set additional options in the Information tab. For more information, see Data graphics, an overview.
Tiptop of Folio
Manage the Excel workbook linked to the diagram
Occasionally, you lot may need to relink or update the associated Excel workbook. You tin conveniently do this from Visio.
Relink the Excel workbook with the Visio diagram
If the Excel workbook linked to a Information Visualizer diagram is renamed or moved to a different location, then the link between the Visio diagram and Excel workbook is broken. This consequence can likewise occur if yous rename the Excel Table.
-
Select the container for the Data Visualizer diagram. This enables the Data Tools Pattern tab in the ribbon.
-
Select Data Tools Design > Relink Source Data.
-
Browse to the renamed or moved Excel workbook.
-
Select a tabular array or custom range in the workbook.
-
To set up the broken link, select Relink.
When you endeavor to refresh the diagram or update the source data and the link is broken, Visio also prompts yous to relink.
Important Don't modify the column names in the Excel Table linked to the diagram. Otherwise, the relink operation fails.
Open the Excel workbook linked to the diagram
You tin change the linked content in Excel directly from Visio. For instance, you lot may want to add a lot of content and observe information technology easier to edit the data in a spreadsheet.
-
In Visio, select the container for the Data Visualizer diagram. This enables the Information Tools Pattern tab in the ribbon.
-
Select Data Tools Design > Open Source Data.
-
Make your changes in Excel, and so save and close the workbook.
-
To see the changes in the diagram, select Data Tools Design > Refresh Diagram.
Tiptop of Page
Next steps
Here are a few tasks y'all might want to do after creating a Data Visualizer diagram.
-
Themes A theme in Visio is a ready of colors and effects that you can apply to a drawing with a single click. Themes are a quick manner to give your drawings a professionally designed look. For more information, run into Utilize a professional await to your drawings with themes.
-
Layout Visio has manual guides and automated tools to help ensure the shapes in your diagram are aligned and spaced well. That helps brand your drawing as articulate every bit possible and give it a well-ordered look. For more information, come across Align and position shapes in a diagram.
-
Export Export a Data Visualizer diagram and associated Excel workbook to a Visio template package (.vtpx). A Visio template packet saves diagram settings, stencils, and data for others to use as a quick starting indicate to create their ain Data Visualizer diagram. Other users can install the template parcel on their computers. For more information, run across Export and install a Data Visualizer template package.
Pinnacle of Folio

Source: https://support.microsoft.com/en-us/office/create-a-data-visualizer-diagram-17211b46-d144-4ca2-9ea7-b0f48f0ae0a6
Posted by: reesegroody.blogspot.com
0 Response to "How To Make A Flow Chart On Excel"
Post a Comment